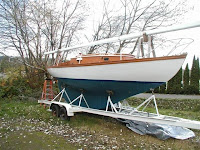
Between 1957 and 1970 Cheoy Lee produced approximatley 133 folkboats originaly sold as the the Offshore 25, better known as the Frisco Flyer.

There were three versions of this small blue-water boat.
91 in all wood and 42 in Fiberglass with wood. There were 55 Type I's and II's and 78 of the Type III's. The Type I (aka the Pacific Clipper) was an all wood boat, had a mast that was stepped through the deck, a traditional folkboat fractional rig and a smaller cabin. The Type II's had a larger teak trunk cabin and a masthead rig. The Type III's had a larger teak dog-house cabin, some "standing" headroom and a masthead rig stepped on deck. The earlier Type III's were solid teak built onto a fiberglass hull and the later Type III’s (1966-1970) were made entirely out of fiberglass with teak paneling.

This boat, Yard # 1507 is one of approximatley only 30 Type III's left. It was out of the water for the previous 16 years when I got it and then about another 5 more while I rebuilt it. It was an empty, cracked hull when given to me and needed a complete restoration/refit.
It took about five years of long nights and weekends of working outside under a tarp, in the garage or in the boat during cold winter nights, wet rainy afternoons and everything in between. The occasionally eager assistant on the project was my four (now ten) year old daughter who can have this boat as soon as I convince her mother to get another one. This blog is the record of all the work that "we" have done to the boat as well as some other somewhat related events with friends and family. Eventually, this will be put together in a book which will stay with the boat.


She still has plenty more to go but for now, Jackaroe has been in the water for a couple years now and thats all that matters...

To see past projects, use the links below.


Questions and comments to Matthewearlgarthwait@gmail.com


Tuesday, May 29, 2007

Portlights out

I started taking the portlights out so I could clean them up, re-bed them and to get a good look at the cabin house gaps. I didn't have the "specialized tool" for removing the bungs but a small bit and a even smaller chisel seemed to do the trick just fine. After getting all the bungs and screws out, the trim pieces came off easily because the bedding compound had dried out years ago.
.
Once these were off, and the glass/hardware was out, I got a better look at how they put the cabin house walls together.

Now, I just have to figure out the best way to address the gaps. So far the favored plan of attack is to run a router along the gap, using straight strip of wood as a guide. Make the gap an even width/depth and fill it with a new piece of teak. It should be able to then swell and contract as designed and look as new.

Nice knees.

Cockpit, coaming, ant food....

I sanded/prepped the cockpit area and now it’s almost ready for varnish. There is still a small nick in the coaming that needs to be repaired. It looks like someone may have accidently cut it with their skill saw when removing the old deck??


This whole area brightened up nicely with a little attention, but because the wood has been exposed for so long, that even after some cleaning and sanding there are still a couple areas with grooves/pits in the grain. But I can live with it. The coaming, like a lot of this boat was poorly painted and or epoxied and then left to weather…so, if the nicest I can get it (without sanding it to death, or rebuilding the coaming) is with a little raised or pitted grain… then I’ll take it.

It’ll still look great under 8 coats of varnish.

All that fresh raw wood and sawdust seemed to call every carpenter ant in the area to come and investigate overnight. I went out to the boat the next day and found a swarm of them sniffing around under the tarp. After the purchase of some not so friendly bug products, I struck a deal with them, they don’t chew on my boat and I don’t kill them.

After sanding and prepping the cockpit area, I removed the seats, hatch, motor and stuffing box covers and prepped them too. A little teak cleaner and light sanding made them look 10 years younger. I plan on varnishing just the edges of the seats and leaving the center to weather again for a nice non slip surface.

Tuesday, May 22, 2007

Restored 1964 Frisco Flyer...

Some nice photos of a type II Flyer here.

http://www.1gigharbor.com/sail/26cl64.htm

Sunday, May 20, 2007

What kind of boat is that?

While Cheoy Lee's are usually pretty easy to tell apart from the crowd, others can be harder. On the "Good Old Boat" website, there is a helpful link called boat identifiers/cove stripes. This really comes in handy when standing there with a friend, staring out at another boat, beer in hand, arguing about out what kind of boat it is and how you know that you're right and their wrong.

http://www.goodoldboat.com/cove_stripes.html.

I've added the link to the margin of this blog too.

Tuesday, May 15, 2007

Ballast...

After some more digging and scraping, I was able to get out all of the crumbling concrete that was on top and on the sides of the giant iron pigs that make up the ballast, but theres still some wet concrete underneath. There seems to be about two inches between the bottom of the keel and the bottom of the pigs that needs to dry out and or come out. I drilled a couple of three inch holes in the bottom of the keel to allow air in and I'll try and get as much of it out as I can reach. I plan on working on the rest of the projects while this really dries out. Water has just sat in there for years and years and if any of it, ballast concrete, fiberglass etc is going to be repaired right, then it needs to completley dry. Then down the road, I'll add new concrete and glass/epoxy it all in. I'd really like to find something better than concrete though.


Here's a couple of pictures of what it looks like now...


Tuesday, May 8, 2007

Closer to home...

Maya's grandparents emailed to say they were in the BVI's again and a little closer to home. They had just sailed from St. Martin to Virgin Gorda and were escorted by 4 dolphins. They sent these pictures. I dont remember them being that dark when they left NH this winter.

Sunday, May 6, 2007

Cabin sides stripped/sanded....

I was supposed to be taking it easy on my foot and using crutches etc but the weather was too nice not to be working on the boat so I spent the entire day standing on/climbing up and down on the ladder. I'm having the stitches out tomorrow so we'll see what the doctor thinks about that.

The sides were in pretty rough shape and removing the old varnish was taking a lot more effort than I would have expected from 16 year old varnish left outside. The varnish was thin and failed in a couple of spots but seemed overly thick and hard as a rock in others. The grain of the wood was really raised as if the wood wasn't properly prepped before covering it up with coat after coat of varnish . It also seemed that someone had just painted the sides with epoxy in places and when one of the previous owners came over to drop off the boom, he said just that. He had covered the sides with epoxy. He said he did this because he planned on just painting the sides and not finishing them bright because they seemed so far gone and because more bright-work means more work in upkeep.

I thought it would be a crime to paint over it and if there was a chance that the wood was still good under there, the reward would be worth it in the end (even considering that bright work would mean more work).


I was able to strip the epoxy and varnish off in a few hours with some really nasty chemical stripper. I had tried some more environmentally friendly stuff but it wasn't even making a dent. It took about three sessions of application and scraping.


After sanding for a few more hours the wood look almost new. I need to replace a few bungs but basically it cleaned really up nice. If I ever decide on how to fix that gap in the boards the sides will get a fresh coat (or 10) of varnish and will look great.

Boom...

For years the boom has been stored in a barn up in Maine and now its finally back in the company of the boat. It's a 12 foot spruce stick with a roller furling system. Looks like someone beat it up a little trying to remove the varnish but all in all, it looks like it's in great shape and just needs a little cosmetic work. I'll strip, sand and varnish the wood and although it seems to work just fine, I'll probably disassemble, clean and grease the gearbox.


Thursday, May 3, 2007

Another delay

The weather has been great here and the sun seems to be back for good but I still haven't been out to the boat much in the last week. I had a small operation on my foot which is making it hard to get up and down a ladder. An old basketball injury never healed right and was becoming more of a problem as I got older. Finally decided to get it worked on and now I have to wait for it to heal before I can get back out there.

This is one of those things that I'm sure no-one cares really about and accordingly I created a new label called "Who cares".


I should be able to start work again in another week.......


The dog doesnt care.